From memes to green screen, here are common projects you can create in Studio 1 and Studio Kids. For more in-depth coverage of the software used, visit Linkedin Learning.
Create a meme: Photoshop
Green Screen Effect: iMovie
Green Screen Effect: Photobooth
Save iMovie Project (Studio 1)
Program a Character: Alice*
Record a Song: Garage Band
Scan Drawing into Sketchbook Pro*
Save iMovie Project (Studio Kids)
*Tutorials with an asterisk use software only available in Studio Kids
Create a Meme in Adobe Photoshop
You’ve probably seen them all over the internet- a picture with a funny phrase above and below a picture. These are called memes. You can create your own meme by adding a photo to Photoshop, and adding text to the image.
Open Adobe Photoshop
Find a picture to meme and drag it onto the desktop
Drag and drop your image into Photoshop
(Optional) To delete your image, click on the x below the top toolbar
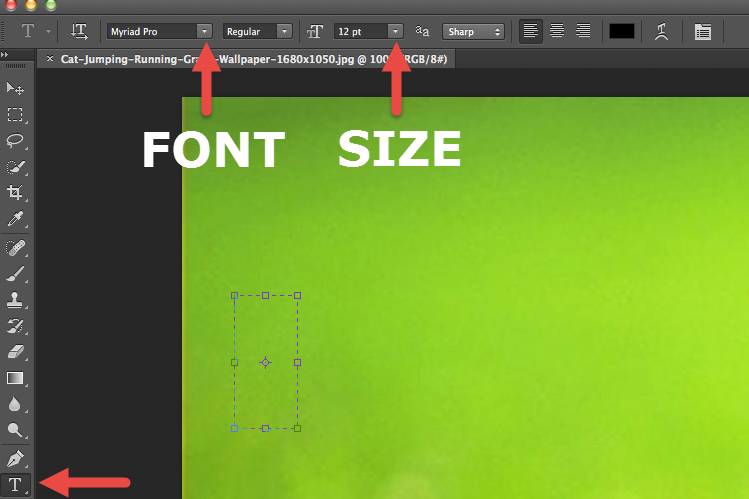
Memes usually have text above and below the subject. Click the text icon to add a message, then change the font to Impact and size to 36 pt. or larger
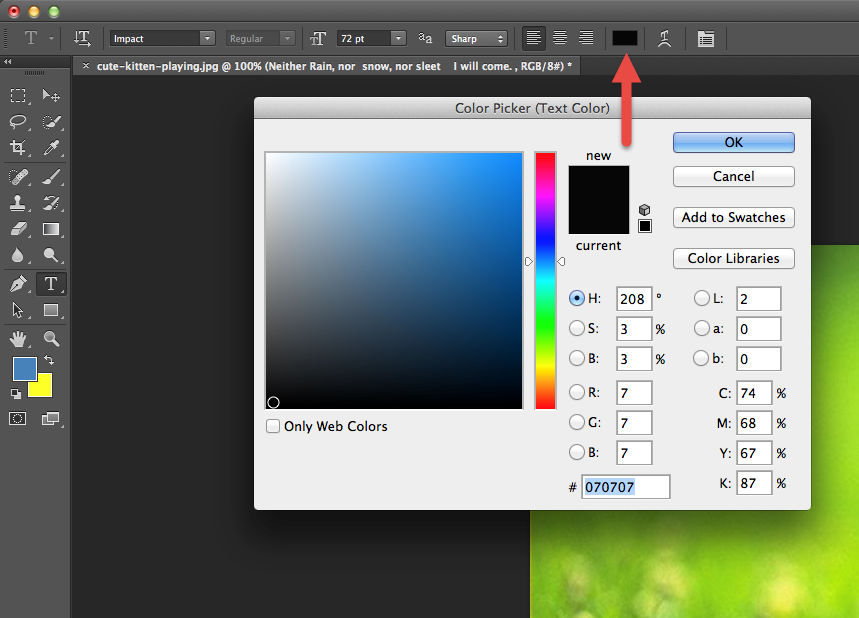
To change the color of the text click the color square on the toolbar at the top and a color picker will open. Note: memes are typically white
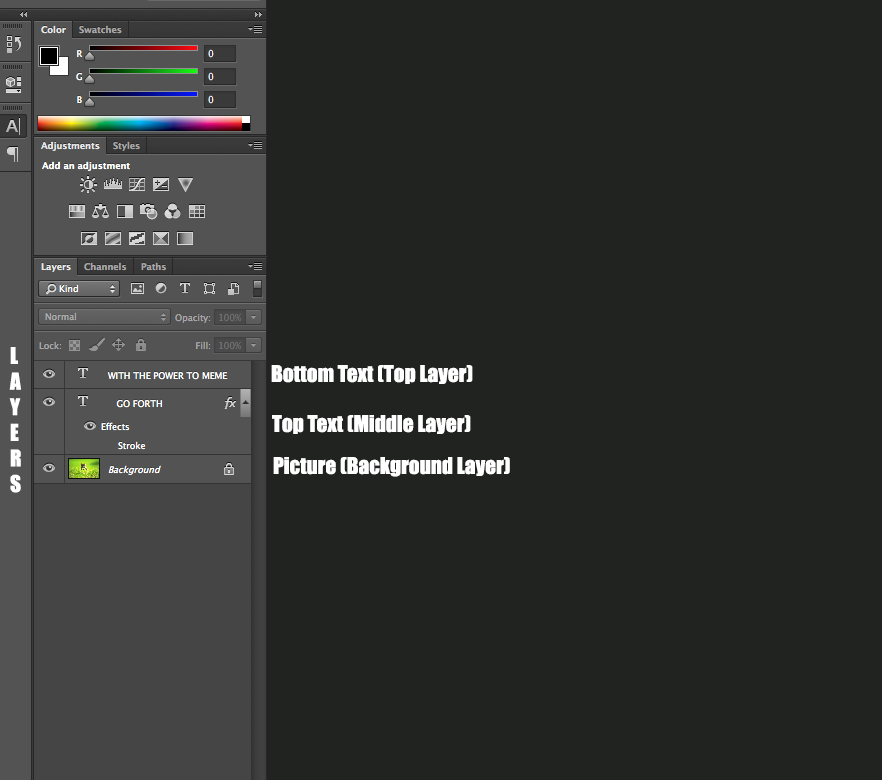
As you add more text and effects to your image, you’ll notice that layers appear on the right side panel. These layers allow you to edit different areas of your photo without effecting areas you don’t want to change. If you find that Photoshop does not let you edit an effect, check that you are in the correct layer
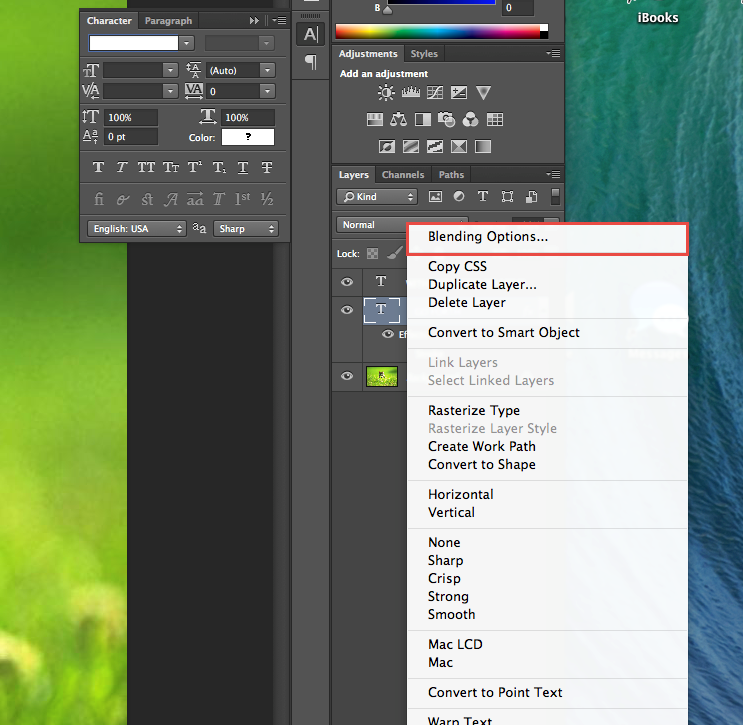
To add a black outline around the text, hold down control and right click on your text layer to pull up a menu. Select Blending Options
Select Stroke from the Blending Options menu
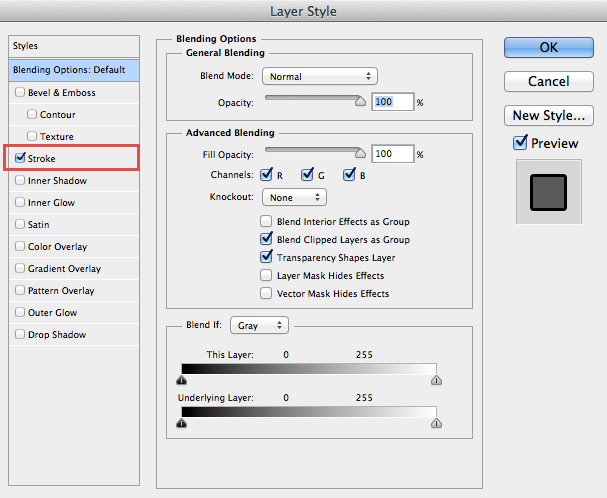
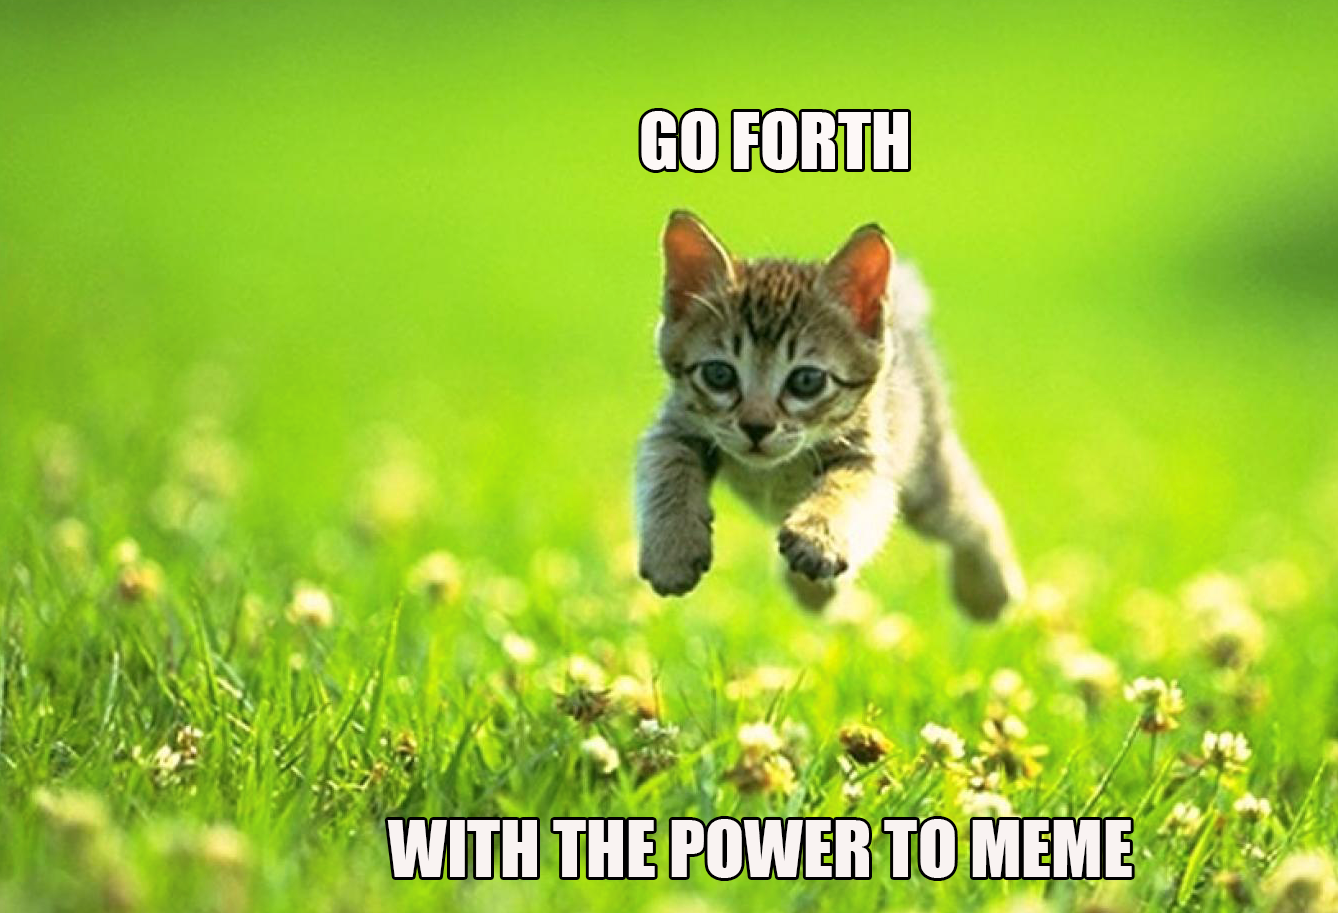
Your text should now have a black border around its edge. If your text is in two different layers, you may have to do this twice
Congrats, you have now completed a meme in Photoshop!
Green Screen Effect: iMovie
Take a picture or video of yourself in front of the green screen
Import your footage onto the computer
Open iMovie and click the create button, select movie, and choose a theme and click create

Select a picture from the desktop folder, Green Screen Backgrounds

Drag the image into your timeline (lower half of the screen)

Drag and drop your green screen footage on top of your background

Click on your green screen footage in the timeline
Click Adjust above the video preview window

Click the drop down arrow in the box that says Cutaway and select Green/Blue Screen

You will now see yourself in front of a new background

Press command + Shift + 3 to save a screenshot to the Desktop
Optional: To remove the pan effect on the video, highlight both clips in teh timeline and click Adjust > Crop > Fit

Green Screen Effect: Photobooth
Open Photo Booth
A pop up will appear and you will see yourself on the display. The camera is in the iMac monitor on the far left (a green light is on at the top of the monitor)
To change the angle of the camera, gently tilt the computer monitor
Click the effects button
Scroll through the effects options, until you see boxes that say User
Backdrop 1, User Backdrop 2.

Find a picture to use for the background
Drag and drop the image into one of the backdrop squares. If your picture does not go into the square, double check that your image is in a picture (jpeg or png file) format. Saving the image as a jpeg or png file will ensure that it is in a picture format.
Click on your backdrop. Photo Booth will tell you to step out of the frame. This allows the picture to cover the entire frame. Quickly step out of the frame.
If you did not step out of the frame in time close and reopen Photo Booth
Step back into the frame. Press the camera button when you are ready to take your picture.

Program a Character: Alice
Make a Character Move and Talk in Alice.
Double click on the icon Alice 3
Select a background for your project
Click Setup Scene.
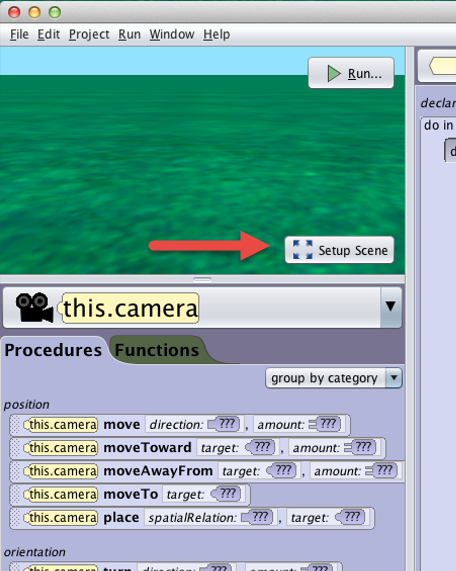
There are several categories people, places, and things, which you can add to your program. You can browse by class hierarchy, theme, or group. When you find something you like, click and drag it into your background
You can add as many characters, and objects to the background as you like. On the right hand toolbar you will see options to rotate, resize, and move your objects around the scene (translation)
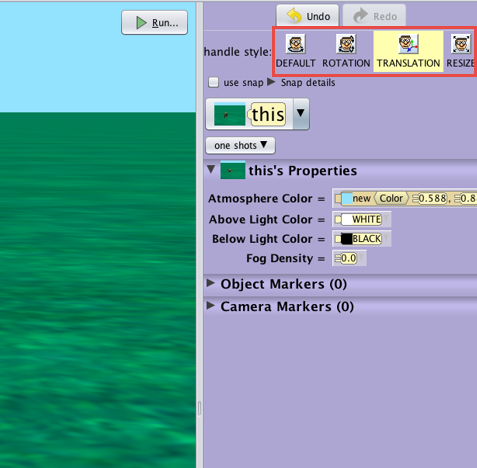
When you are done adding and positioning objects to your program, click edit code.
Click on the character that you want to move. Under the procedures tab there is code that lets you make your character talk, think, move, or change its appearance.
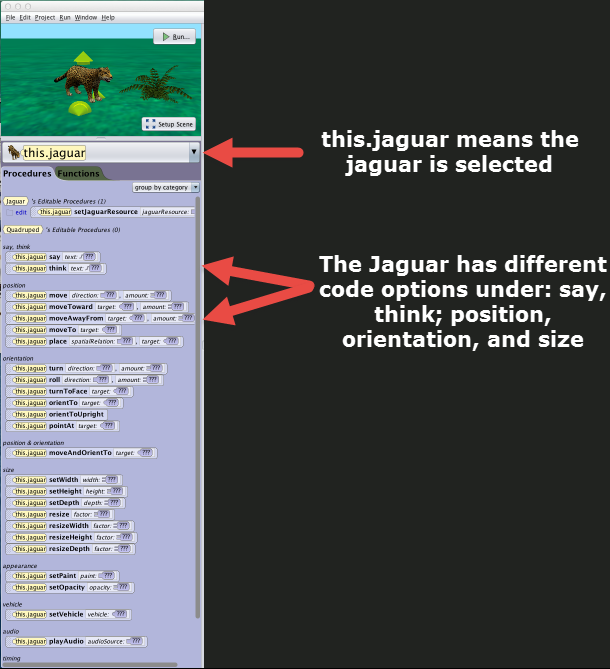
Under the position section, drag the code: ![]() into the scene screen. Click the direction, and amount that you want your object to move.
into the scene screen. Click the direction, and amount that you want your object to move.
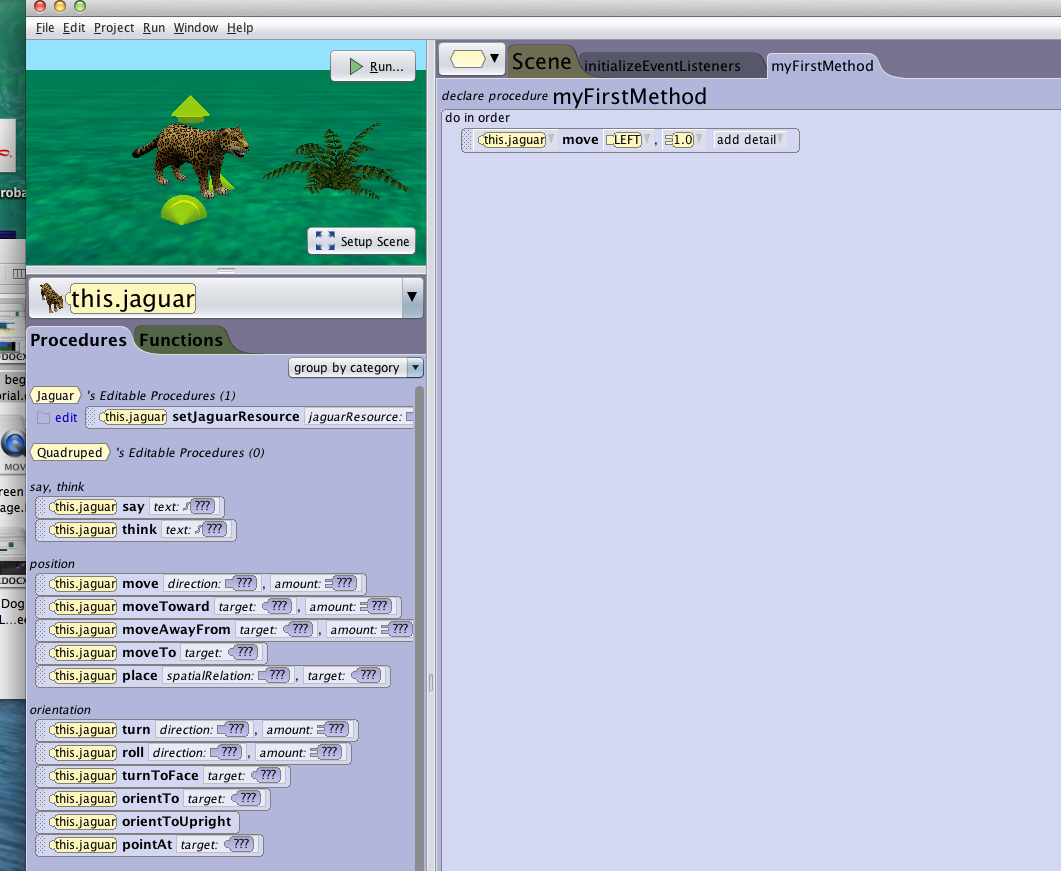
Under the say, think section drag  directly below your move.direction code. Your object can say “Hello”, or you can type text for your character to say.
Click Run to see your object move and talk
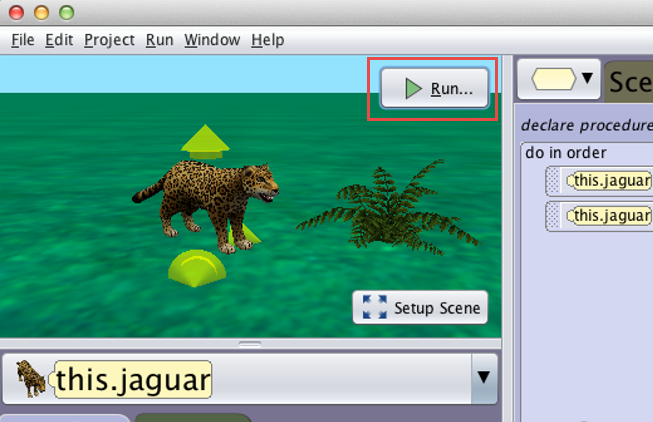
Congrats, you have just made an object in Alice move and talk! Try adding more code to your characters.
Record a Song in GarageBand
Double click on the program, GarageBand
When GarageBand opens, it gives you a variety of options for instruments
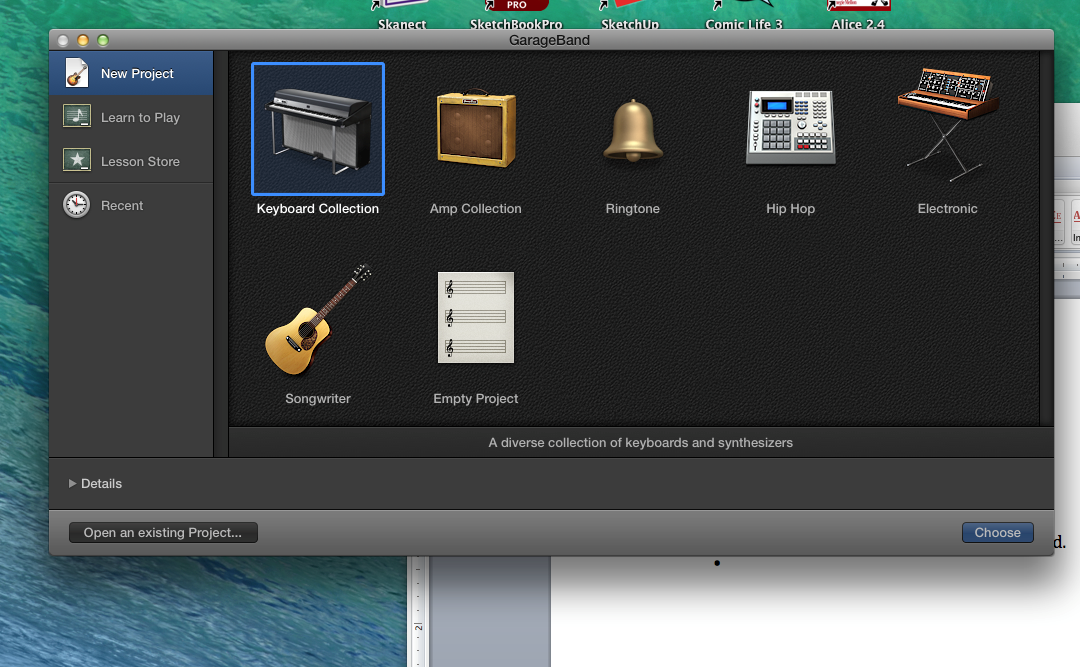
Select one of the options. If you are unsure which one to pick, click Empty Project
When you touch the keyboard, you should now hear sound
If you don’t hear anything, turn the volume up on the computer keyboard and make sure the speakers are on
The panel on the left shows you what instrument you are playing
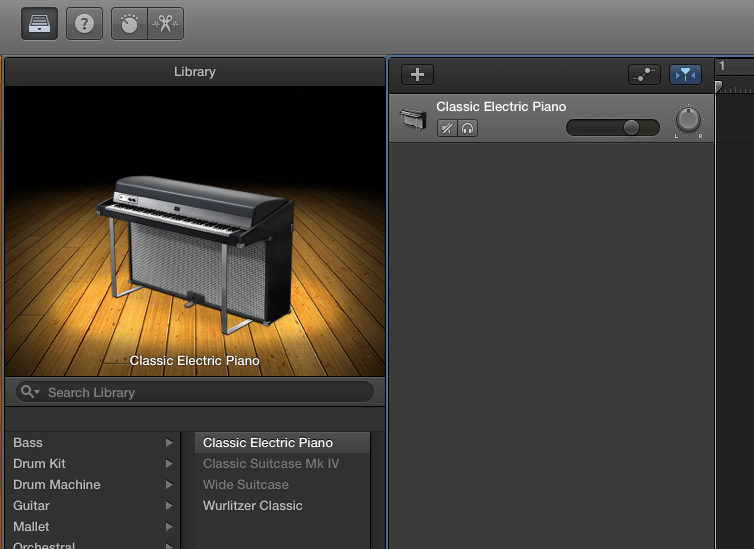
You can change your instrument by clicking on the list of musical instruments on the left
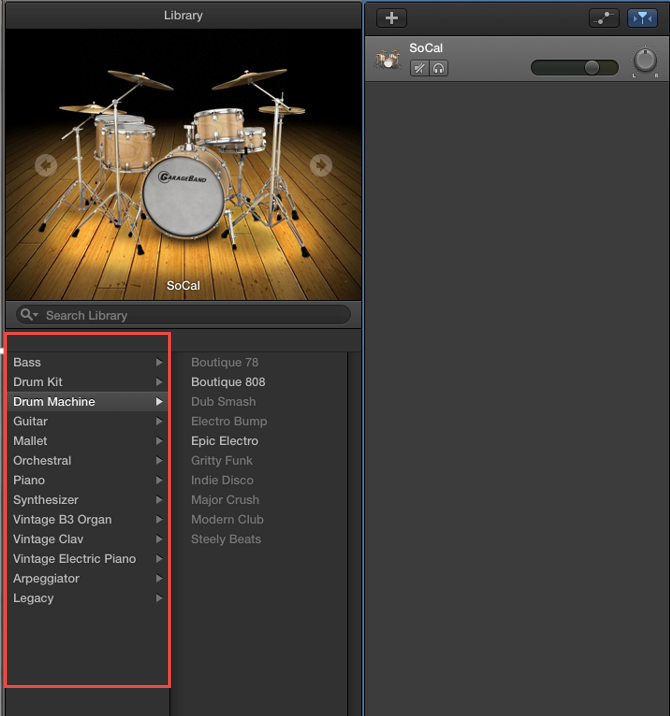
To add another instrument, or to change from the keyboard to the microphone click the + button.
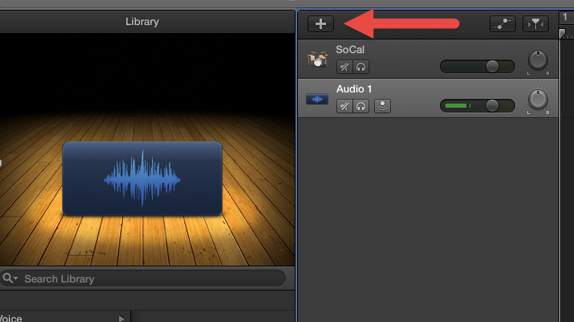
A box will pop up. Select the microphone icon for the microphone
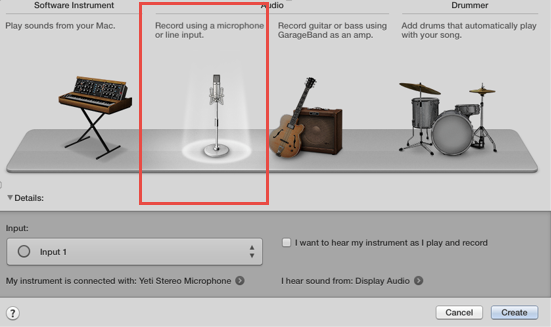
When you are ready to start recording your song press the record button.

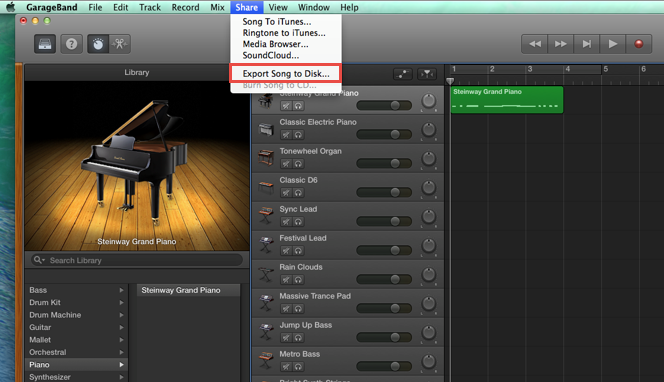
To save the file click Share > Export Song to Disk. This will create a file on the desktop which you can then email or save to a flash drive
Scan a Drawing into Sketchbook Pro
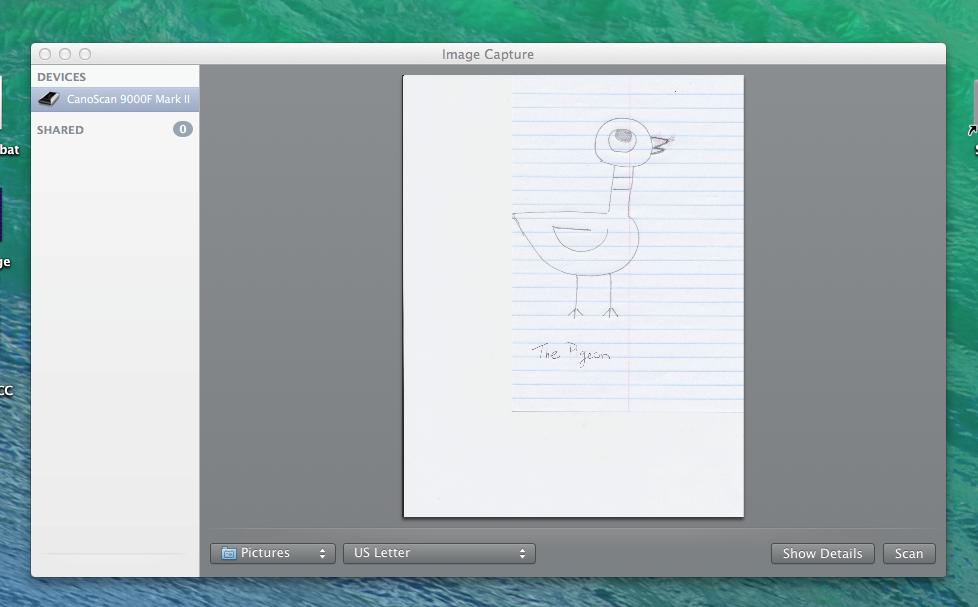
Press the On button on the Canon scanner
Open the scanner, place your drawing face down on the glass and close the scanner
Press the autoscan button on the scanner
A window will pop up with a picture of your scan
Double click on the Sketchbook Pro icon
![]()
Click File > Open > Pictures> Select your scanned image
The scan will now appear in Sketchbook Pro
If you do not see the brushes toolbar on the left hand side, click the brushes button on the top toolbar

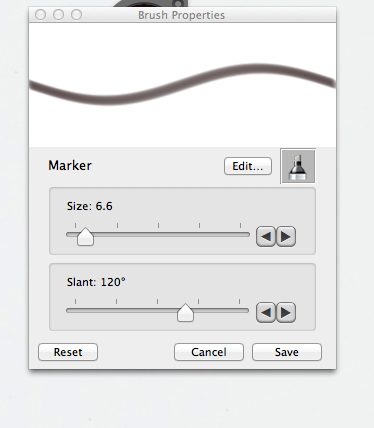
To change the width of the brush stroke, double click and modify the size or slant of the stroke
Brush color is shown in the color palette in the upper left hand corner. Click the color to open the color wheel and change colors
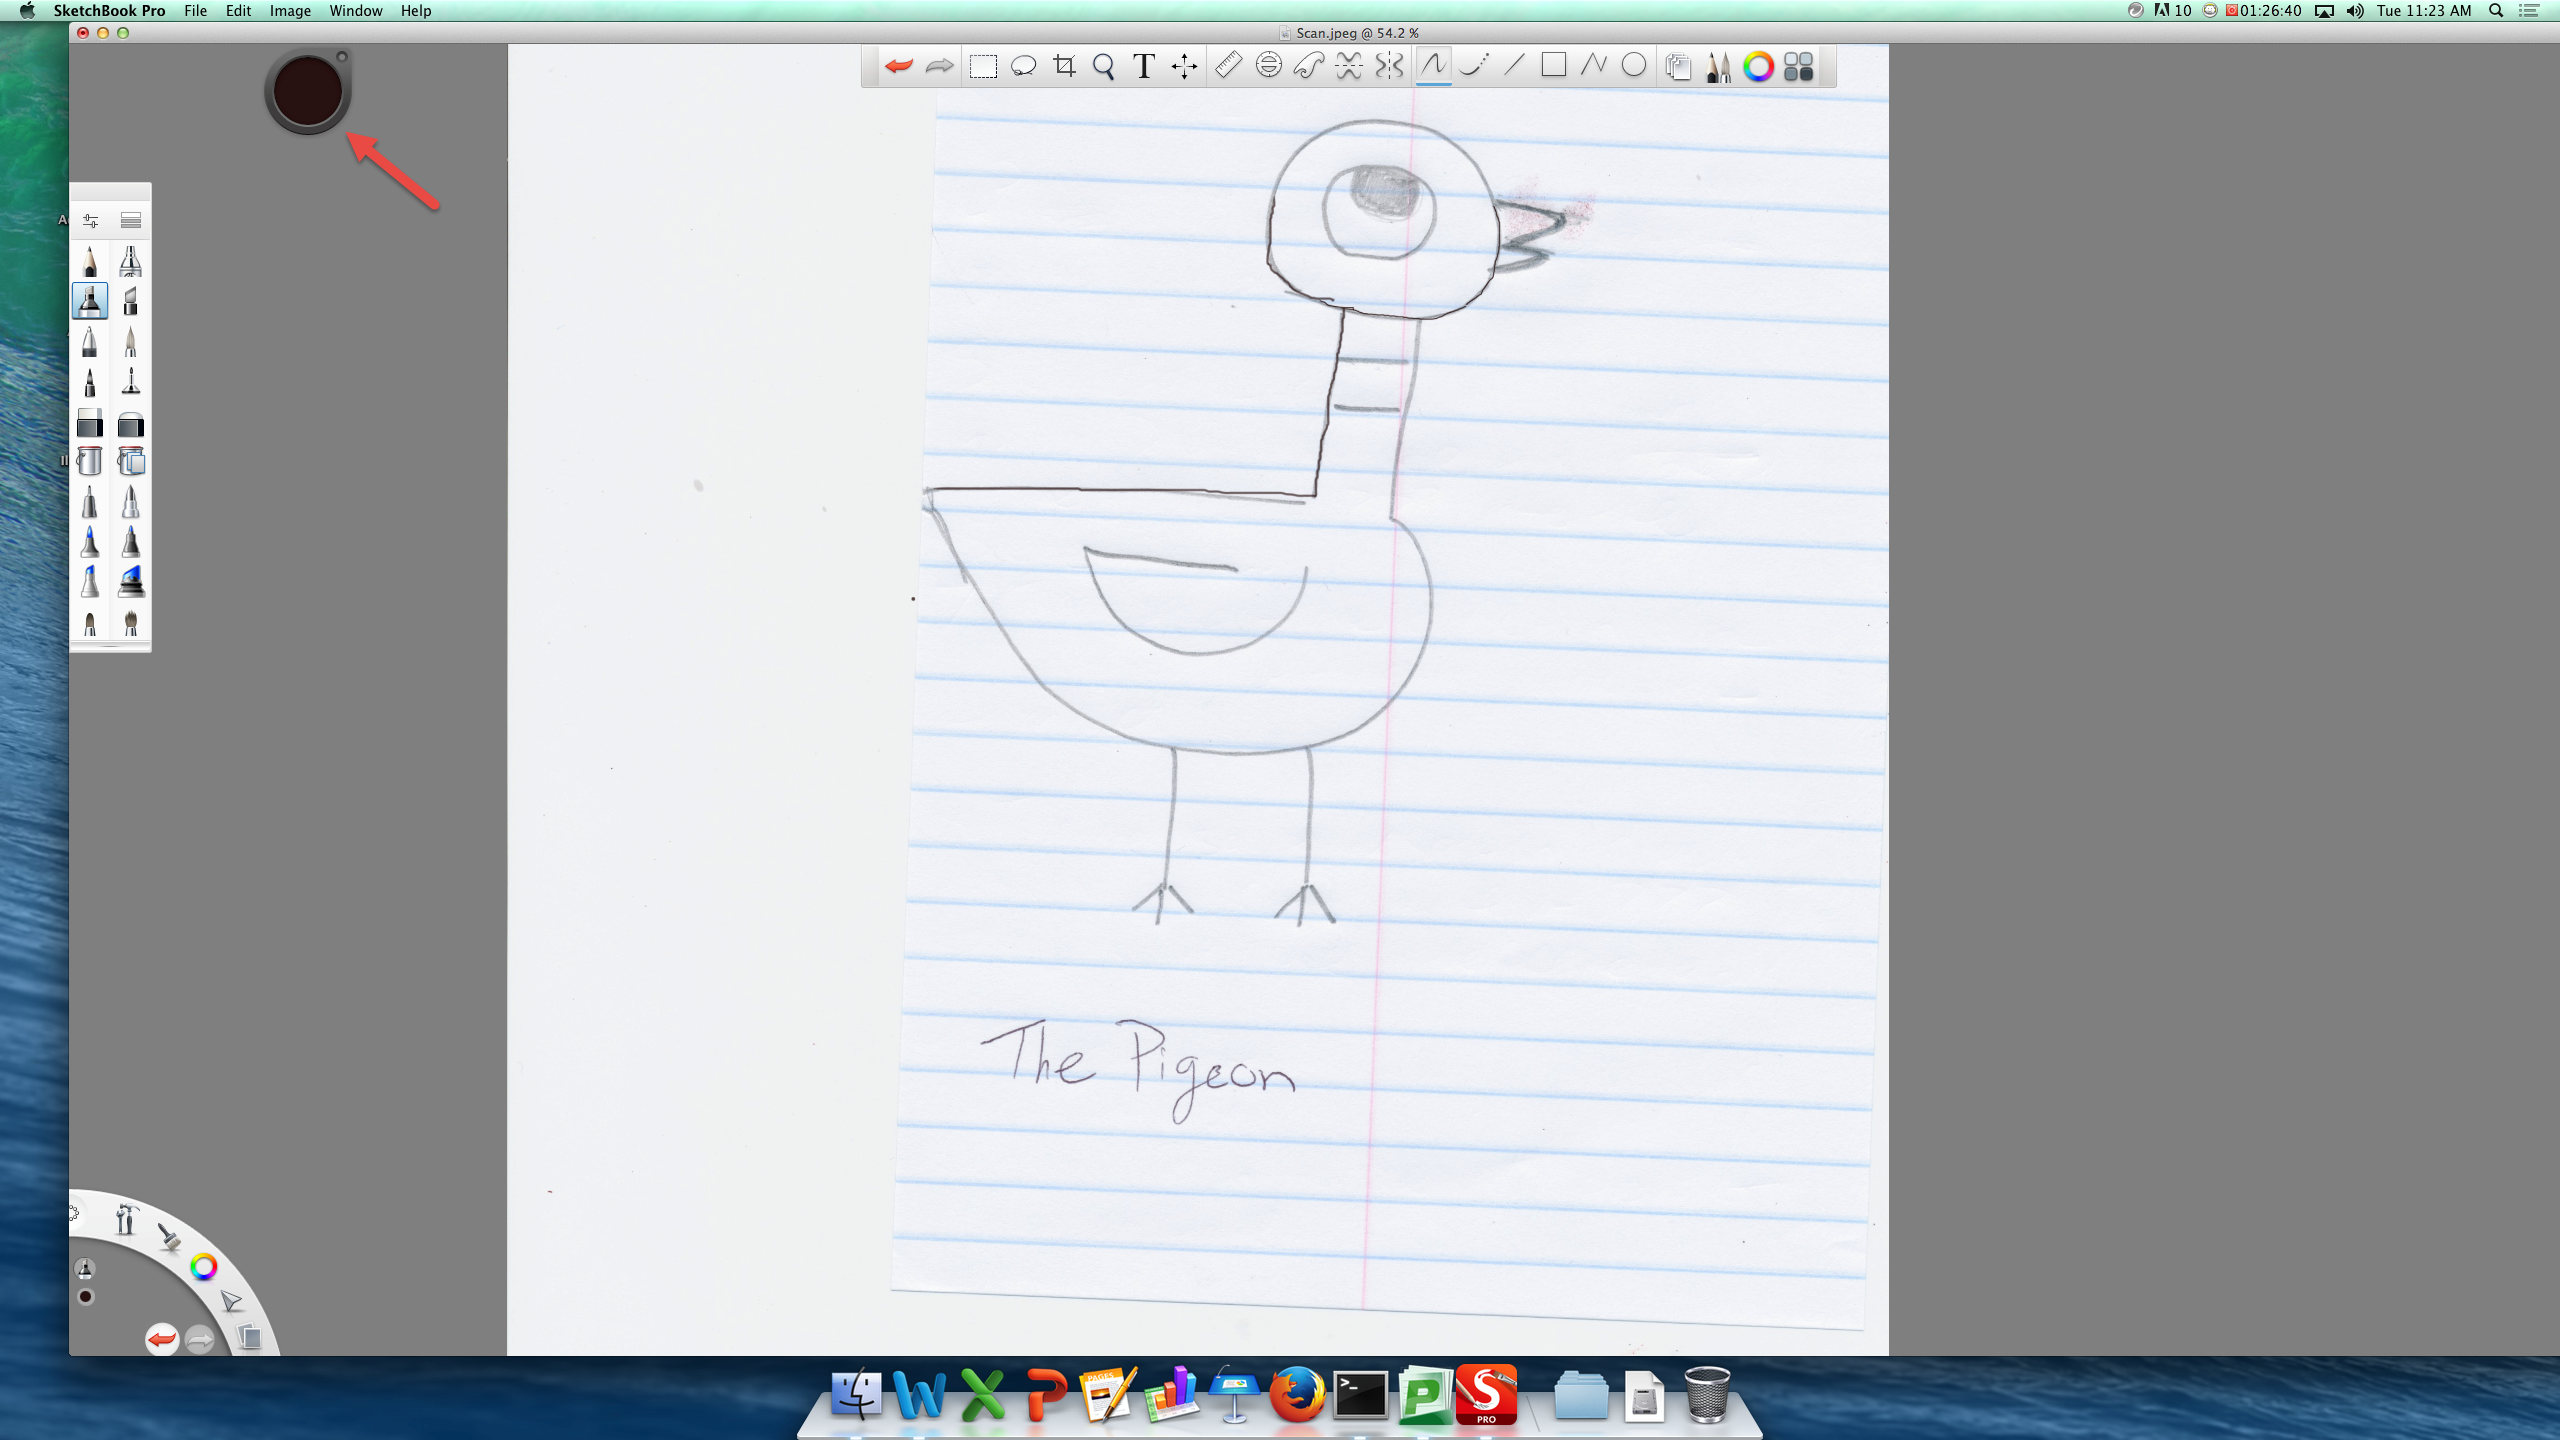
Use the zoom feature to make the image easier to edit. To zoom in use the scroll button on the mouse
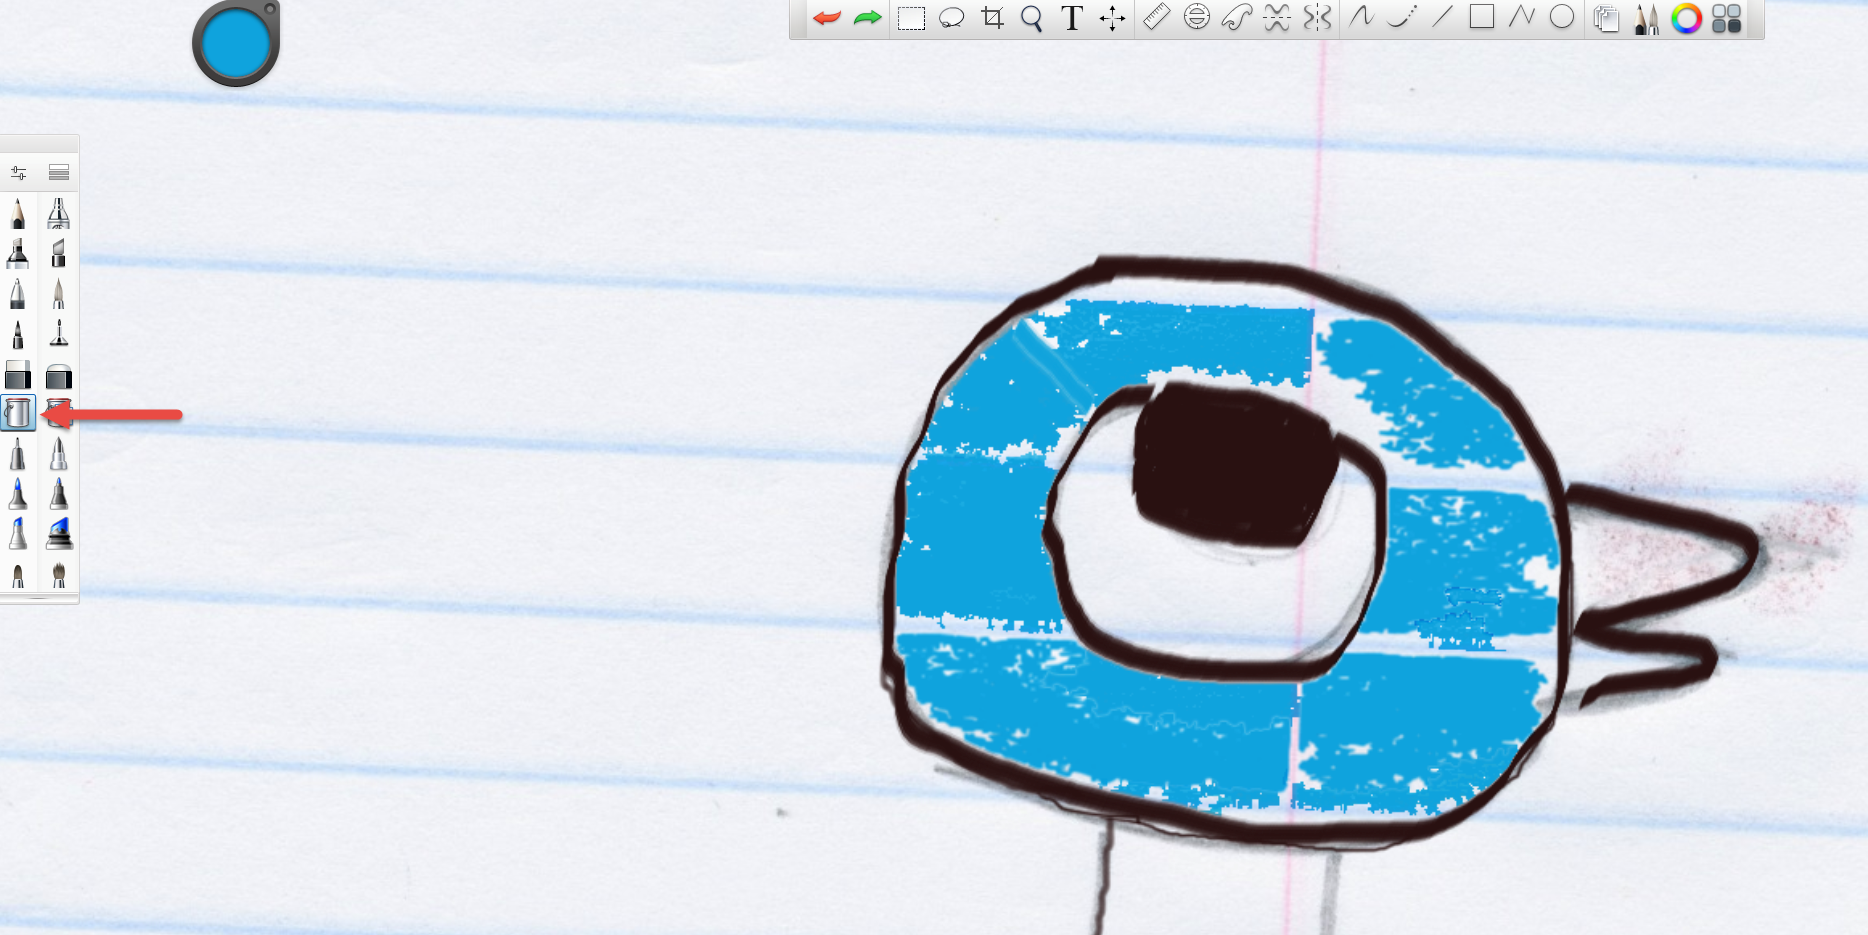
The bucket icon in the brushes toolbar will let you quickly fill in large blocks of color
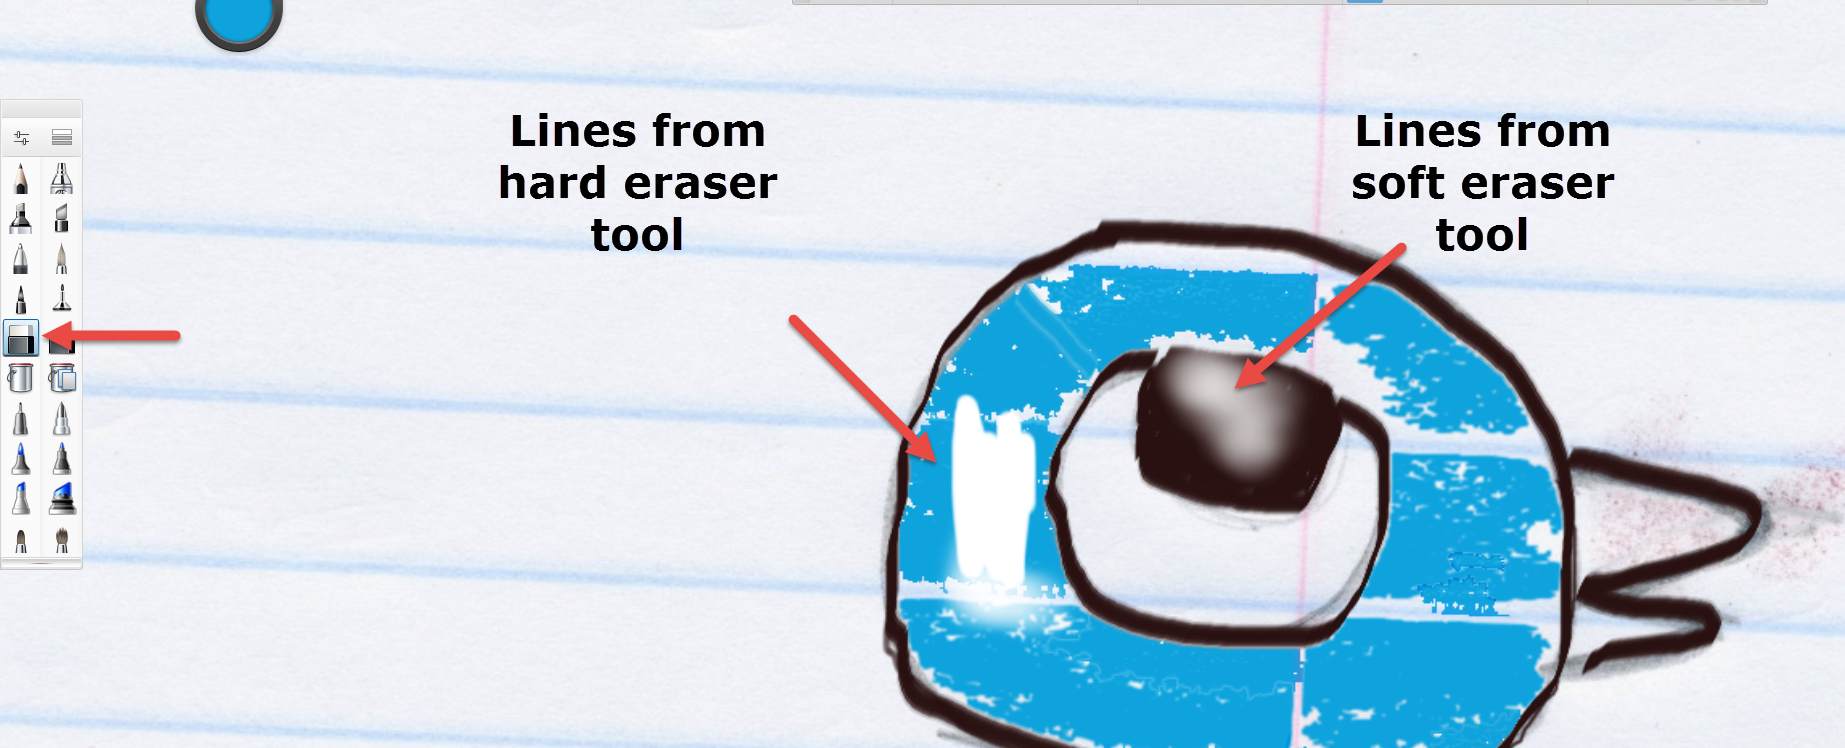
To erase click the undo button, or select the hard or soft eraser on the brushes toolbar. A hard eraser makes strong white marks and a soft eraser gradually erases, creating a blending look
Sketchbook Pro has lots of other fun tools that will enhance your drawing. Try some out, and have fun creating!
Save iMovie Project (Studio 1)
-
• Click on a blank section of the Desktop
-
• At the top of the screen click Go > Home > Movies
-
• Drag iMovie Library to USB drive
Opening the saved project
-
• Click on a blank section of the Desktop
-
• At the top of the screen click Go > Desktop
-
• Open the USB
-
• Drag iMovie Library into the iMovie folder
Save iMovie Project (Studio Kids)
Save Project
• Click on a blank section of the Desktop
• At the top of the screen, click Go > Desktop > Movies
• Drag iMovie Library to USB drive
Open Project to Edit
• Click on a blank section of the Desktop
• At the top of the screen, click Go > Desktop > Movies
• Open the USB
• Drag iMovie Library into the iMovie Folder and choose replace
• Open iMovie and your project will appear
